


29883 In-game now on Steam


Surviving the L4D Survival Pack
April 16, 2009 - Kerry Davis and Scott Dalton
Survival Mode pits your team against never ending waves of infected. Sounds simple. Just trap the survivors in a small part of a map, unleash the hordes, and record the longest time. Survival Mode, which will be released next week, is actually a bit more than that.
Our goals for Survival Mode are to deliver a mode of play distinct from Campaign or Versus, have games that regularly last under ten minutes, and emphasize competition with team play through leaderboards.
Survival Mode draws on the planning and communication aspects of a successful Finale or Crescendo event, while taking it to another level. It rapidly hits a fever pitch that only a well coordinated team will be able to successfully survive. Everything from simply covering a reviving teammate, to making every shot count to minimize reloads becomes crucial in Survival Mode.
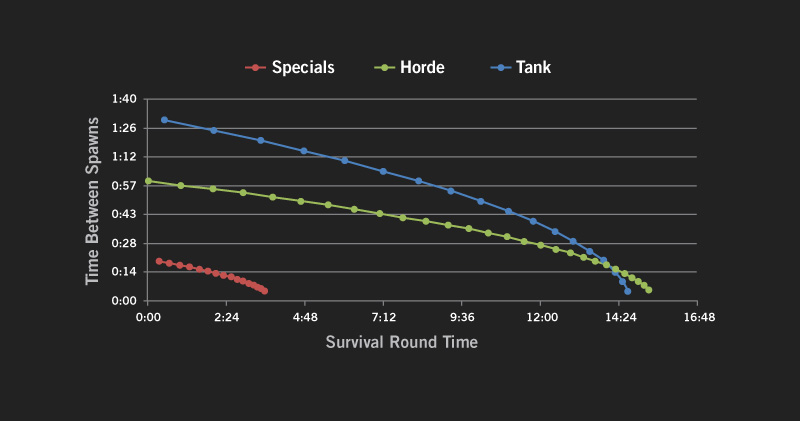
Given the importance of pacing in Survival Mode, we need to define as precisely as possible how the difficulty ramps up during the course of a round. We have numerous variables to work with: mob spawn frequency, special infected spawn frequency, number of each type of special infected, total number of special infected, tank spawn frequency, total number of tanks, and so on. We need all of these variables to work together to create a fairly smooth difficulty curve.
If the curve ramps up too sharply, we find that teams of all skill levels tend to hit a wall at the same time. There isn't enough variation in the times to separate great teams from average ones. If the curve is too flat, then average teams will have a good experience, but really good teams can grind on long enough to cross the line from having fun to just getting worn out.
It might seem that just gradually increasing spawn rates and numbers of infected will create a nice smooth curve, but it turns out to be much trickier than that. Each type of infected has its own spawn schedule, so even though the individual spawn curves may be designed to be fairly easy at a particular point in time, sometimes they overlap in just such a way that the players find themselves in a really bad situation far earlier than we intend.
For example, a tank will be much harder to fight if a mob of common infected spawns at the same time - and nearly impossible if three hunters also show up right at that moment. A similar situation can happen due to variables outside our control - a team may not dispatch a tank or mob quickly enough, causing subsequent waves to start arriving and piling on to an already difficult battle. It's also hard to anticipate when teams will need to make an ammo run or heal up, both of which can be extremely difficult only a few minutes into the round. In order to help visualize these overlap points and the collapse of each spawn curve, we graphed out the wave behavior of infected over the course of a survival round.
The last variable we added was the "lull" - a short interval of time during which nothing new will spawn. Each lull gets slightly longer as the round progresses, but that's no guarantee the team will actually see the lull - it just prevents new infected from spawning. It doesn't help with infected that are already in the arena. Killing mobs and tanks as quickly as possible is the best way to ensure that a team can take advantage of a lull to heal, resupply ammo, or just move to a better location with more supplies.
Given the extreme pace of Survival Mode, the number of zombies killed in a single round often outnumbers an entire campaign. Even optimizing towards using pistols to eliminate common hordes, ammunition usually becomes an issue at some point. As ammo piles provide a unique infinite resupply for players, they tend to be in relatively less defensible positions in the Survival arenas. This means making an all important ammo run is rarely a safe proposition and requires good teamwork and planning. Timing your resources correctly to be able to make a run when necessary can make or break a team. The perfect pipebomb or well placed molotov can mean the difference between a cakewalk and catastrophe.
The Hospital Elevator, for example, might seem like an easy Crescendo Event to conquer. Hit the elevator button and holdout until the doors open for a quick escape. In Survival Mode, however, the area begins locked down. Areas open as the hordes come in, breaking down the doors to reach the survivors. In each room there are additional caches of vital pills, pipes, and Molotovs. By moving from location to location, using up the plentiful supplies as needed, a team can maximize their time in a game where the elevator never arrives to offer escape. In other maps, items may be less plentiful and require careful planning on their usage. Managing one's inventory and resources works hand-in-hand with teamwork in Survival Mode.
Next week you will be able to see our design in action when the DLC is released for the PC and 360.